文件系统
页面(page)
page 文件允许您定义路由独有的 UI。您可以默认创建一个页面,并从文件中导出一个组件
// app/blog/[slug]/page.tsx
export default function Page({
  params,
  searchParams,
}: {
  params: Promise<{ slug: string }>;
  searchParams: Promise<{ [key: string]: string | string[] | undefined }>;
}) {
  return <h1>My Page</h1>;
}
Props
这两个参数都是 Promise,在服务端组件中直接使用异步函数,通过 await 获取参数。
export default async function Page({
  params,
}: {
  params: Promise<{ slug: string }>;
}) {
  const { slug } = await params;
  return <h1>Blog Post: {slug}</h1>;
}
客户端组件不能使用 async,可以使用 React 的 use Hook 来获取参数。
'use client';

import { use } from 'react';

export default function Page({
  params,
  searchParams,
}: {
  params: Promise<{ slug: string }>;
  searchParams: Promise<{ [key: string]: string | string[] | undefined }>;
}) {
  const { slug } = use(params);
  const { query } = use(searchParams);
}
布局(Layout)
布局不会重新渲染。它们可以被缓存并重复使用,以避免在页面之间导航时进行不必要的计算。
export default async function Layout({
  children
  params,
}: {
  children: React.ReactNode
  params: Promise<{ team: string }>
}) {
  const { team } = await params
}
根布局
布局支持嵌套,最顶层的布局我们称之为根布局(Root Layout),也就是 app/layout.js。它会应用于所有的路由。
app目录必须包含根布局,也就是app/layout.js这个文件是必需的- 根布局必须包含
html和body标签,其他布局不能包含这些标签。如果你要更改这些标签,不推荐直接修改 - 你可以使用 路由组 创建多个根布局
- 默认根布局是 服务端组件,且不能设置为客户端组件
// app/layout.js
import './globals.css';
import { Inter } from 'next/font/google';

const inter = Inter({ subsets: ['latin'] });

export const metadata = {
  title: 'Create Next App',
  description: 'Generated by create next app',
};

export default function RootLayout({ children }) {
  return (
    <html lang="en">
      <body className={inter.className}>{children}</body>
    </html>
  );
}
嵌套布局
layout 文件会将同级 page 文件作为 props 中的 children
模板(template)
模板文件类似于布局 ,因为它包装了布局或页面。与跨路由持久化和维护状态的布局不同,模板被赋予一个唯一的键,这意味着子客户端组件会在导航时重置其状态。
export default function Template({ children }: { children: React.ReactNode }) {
  return <div>{children}</div>;
}
就嵌套而言, template 渲染在布局及其子元素之间。以下是简化的输出:
<Layout>
{/* Note that the template is given a unique key. */}
<Template key={routeParam}>{children}</Template>
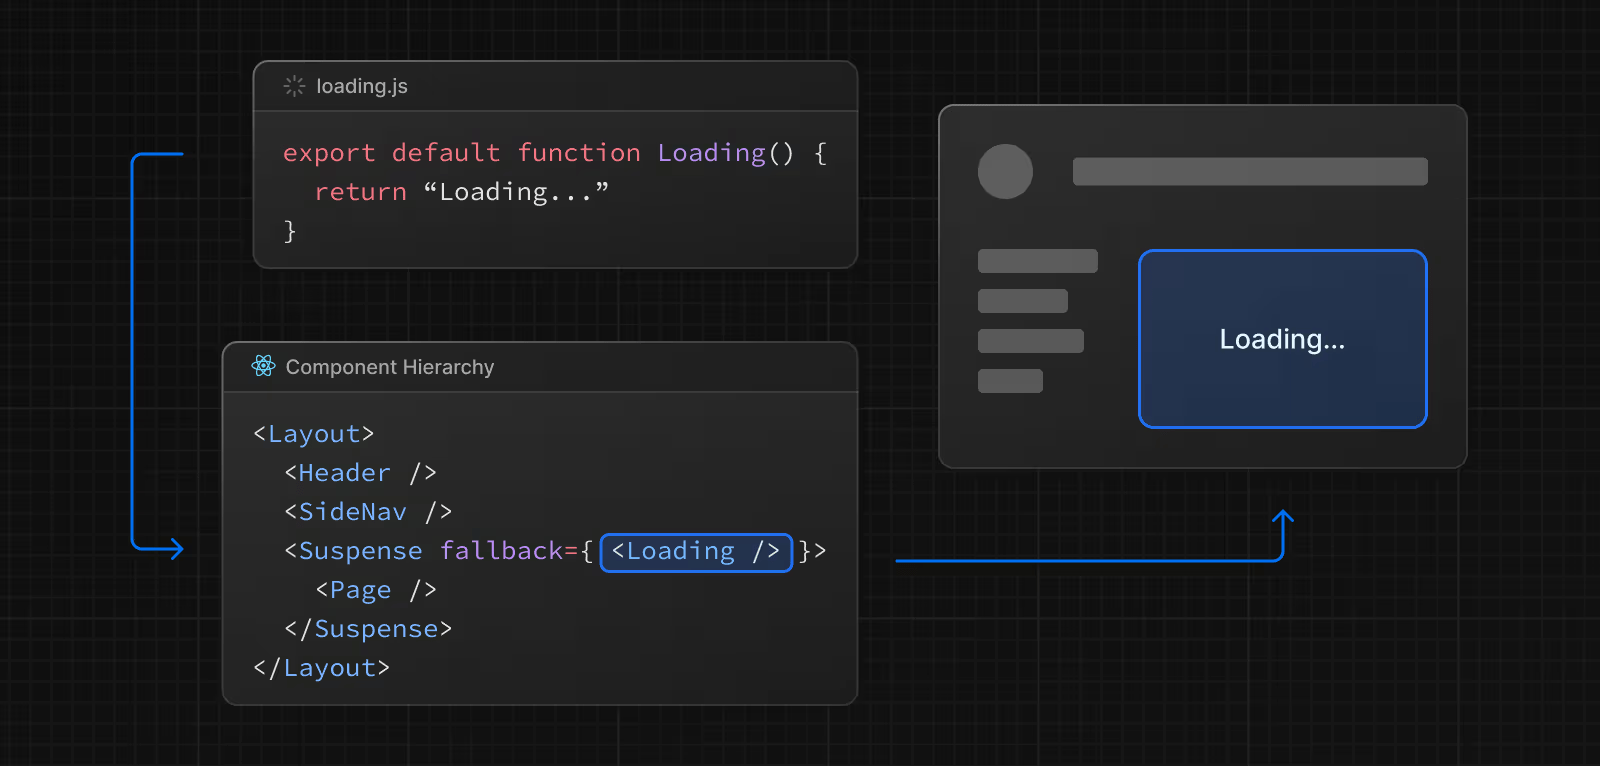
</Layout>加载页面(loading)
这个功能的实现借助了 React 的 Suspense API。它实现的效果就是当发生路由变化的时候,立刻展示 fallback UI,等加载完成后,展示数据。
export default function Loading() {
  // You can add any UI inside Loading, including a Skeleton.
  return <LoadingSkeleton />;
}
加载 UI 组件不接受任何参数。
在同一个文件夹中, loading 将嵌套在 layout 中。它会自动将 page 及其下面的所有子文件包裹在 <Suspense> 边界内。
错误处理界面(error)
error 将路由段及其嵌套子段包装在 React 错误边界中 。当在边界内抛出错误时, error 组件会显示为后备 UI。
'use client'; // Error boundaries must be Client Components

import { useEffect } from 'react';

export default function Error({
  error,
  reset,
}: {
  error: Error & { digest?: string };
  reset: () => void;
}) {
  useEffect(() => {
    // Log the error to an error reporting service
    console.error(error);
  }, [error]);

  return (
    <div>
      <h2>Something went wrong!</h2>
      <button
        onClick={
          // Attempt to recover by trying to re-render the segment
          () => reset()
        }
      >
        Try again
      </button>
    </div>
  );
}
全局错误
虽然不太常见,但您可以使用位于应用根目录中的 global-error 来处理根布局或模板中的错误,即使在使用国际化功能时也是如此。全局错误 UI 必须定义自己的 <html> 和 <body> 标签。此文件在激活时会替换根布局或模板。
'use client'; // Error boundaries must be Client Components

export default function GlobalError({
  error,
  reset,
}: {
  error: Error & { digest?: string };
  reset: () => void;
}) {
  return (
    // global-error must include html and body tags
    <html>
      <body>
        <h2>Something went wrong!</h2>
        <button onClick={() => reset()}>Try again</button>
      </body>
    </html>
  );
}
not-found
关于 app/not-found.tsx 一定要说明一点的是,它只能由两种情况触发:
- 当组件抛出了 notFound 函数的时候
- 当路由地址不匹配的时候
所以 app/not-found.tsx 可以修改默认 404 页面的样式。但是,如果 not-found.tsx放到了任何子文件夹下,它只能由 notFound函数手动触发。比如这样:
// /dashboard/blog/page.tsx
import { notFound } from 'next/navigation';

export default function Page() {
  notFound();
  return <></>;
}
执行 notFound 函数时,会由最近的 not-found.tsx 来处理。但如果直接访问不存在的路由,则都是由 app/not-found.tsx 来处理。